Manage workspace
Most areas of the workspace can only be viewed and managed by administrators.
As an administrator in innoGPT, you centrally manage how your team works with the platform—from user management and model sharing to roles, permissions, and central workspace settings.
Where can I find the workspace settings?
Click on your profile picture in the bottom left corner → Settings → left sidebar. Here, as an admin, you’ll find all administrative areas:
Workspace settings — Name, logo, company context
User management — members, roles, permissions
Models — which AI models are available to your team
Billing — Plan, Usage, Invoices
Integrations — SharePoint, OneDrive, Google Drive, etc.
Unlock models for your team
As an admin, you decide which AI models your team members can select in the chat. This ensures that your team only works with models that align with your data protection, cost, and application strategy.
Where do you enable models?

Go to Settings → Models → Chat
Select the appropriate mode:
Auto Mode — innoGPT automatically selects suitable default models
Advanced Mode — you control which models are active per provider
All Models — all available models are enabled
Enable the desired models via toggle — grouped by provider (Anthropic, OpenAI, Google, Mistral, …) and hosting region (EU / Global)
Important settings
Smart Select: EU Models Only — when enabled, Smart Select uses only EU-hosted models, even if non-EU models are enabled
Default chat model — specify which model each new chat in your workspace starts with
EU Hosting / EU Processing — Models in this group are hosted entirely within the EU and are GDPR-compliant
Privacy Note: None of the enabled models use your data for training purposes. Conversations remain private — regardless of the provider. For global EU models: These models are hosted and processed in global data centers. Data protection standards may differ from EU standards, but often offer advanced features or better performance.
Tip: If your team primarily works with Smart Select, you can specifically control which models are used behind the scenes. This prevents expensive premium models from being automatically selected for simple queries.
Invite & Manage Members
You can manage your team under Settings → User Management → Members.
Here’s how to invite new members
Click on Invite Member
Enter the email address
Select the appropriate role (see next section)
Send the invitation—the user will receive an email with a join link
Once a member joins the workspace, they will be included in the next billing cycle, starting from the join date.

Remove members
You can remove members from the workspace via the 3-dot menu next to the user. When a member is removed, all of their chats are deleted. The user can then set up a new, separate workspace with the same email address if they wish. Once a member has been removed, they are no longer included in the billing.
Admin licenses
Admin users generally require a license as well. For larger companies, we can exclude admin accounts from the license calculation upon request—just contact us to discuss this.
User Management - Members, Roles, Permissions
You can find roles under Settings - User Management - Roles
innoGPT provides three standard roles that you can customize as needed:
You can also create your own roles, e.g., "Power User," "Marketing Team," or "External."
Create your own role
Go to Settings → User Management → Roles
Click on New Role
Enter a name and a description
Save — the role is now available when loading
Select the desired permissions
Control permissions per role
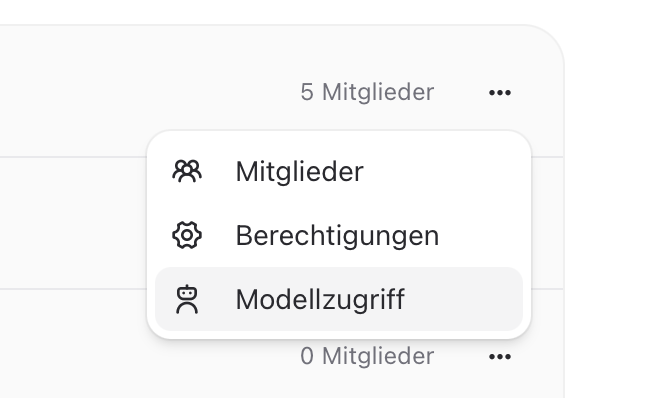
Use the 3-dot menu → Permissions to open the Permissions Editor. Here, you can selectively enable or disable which functions the role is allowed to use:
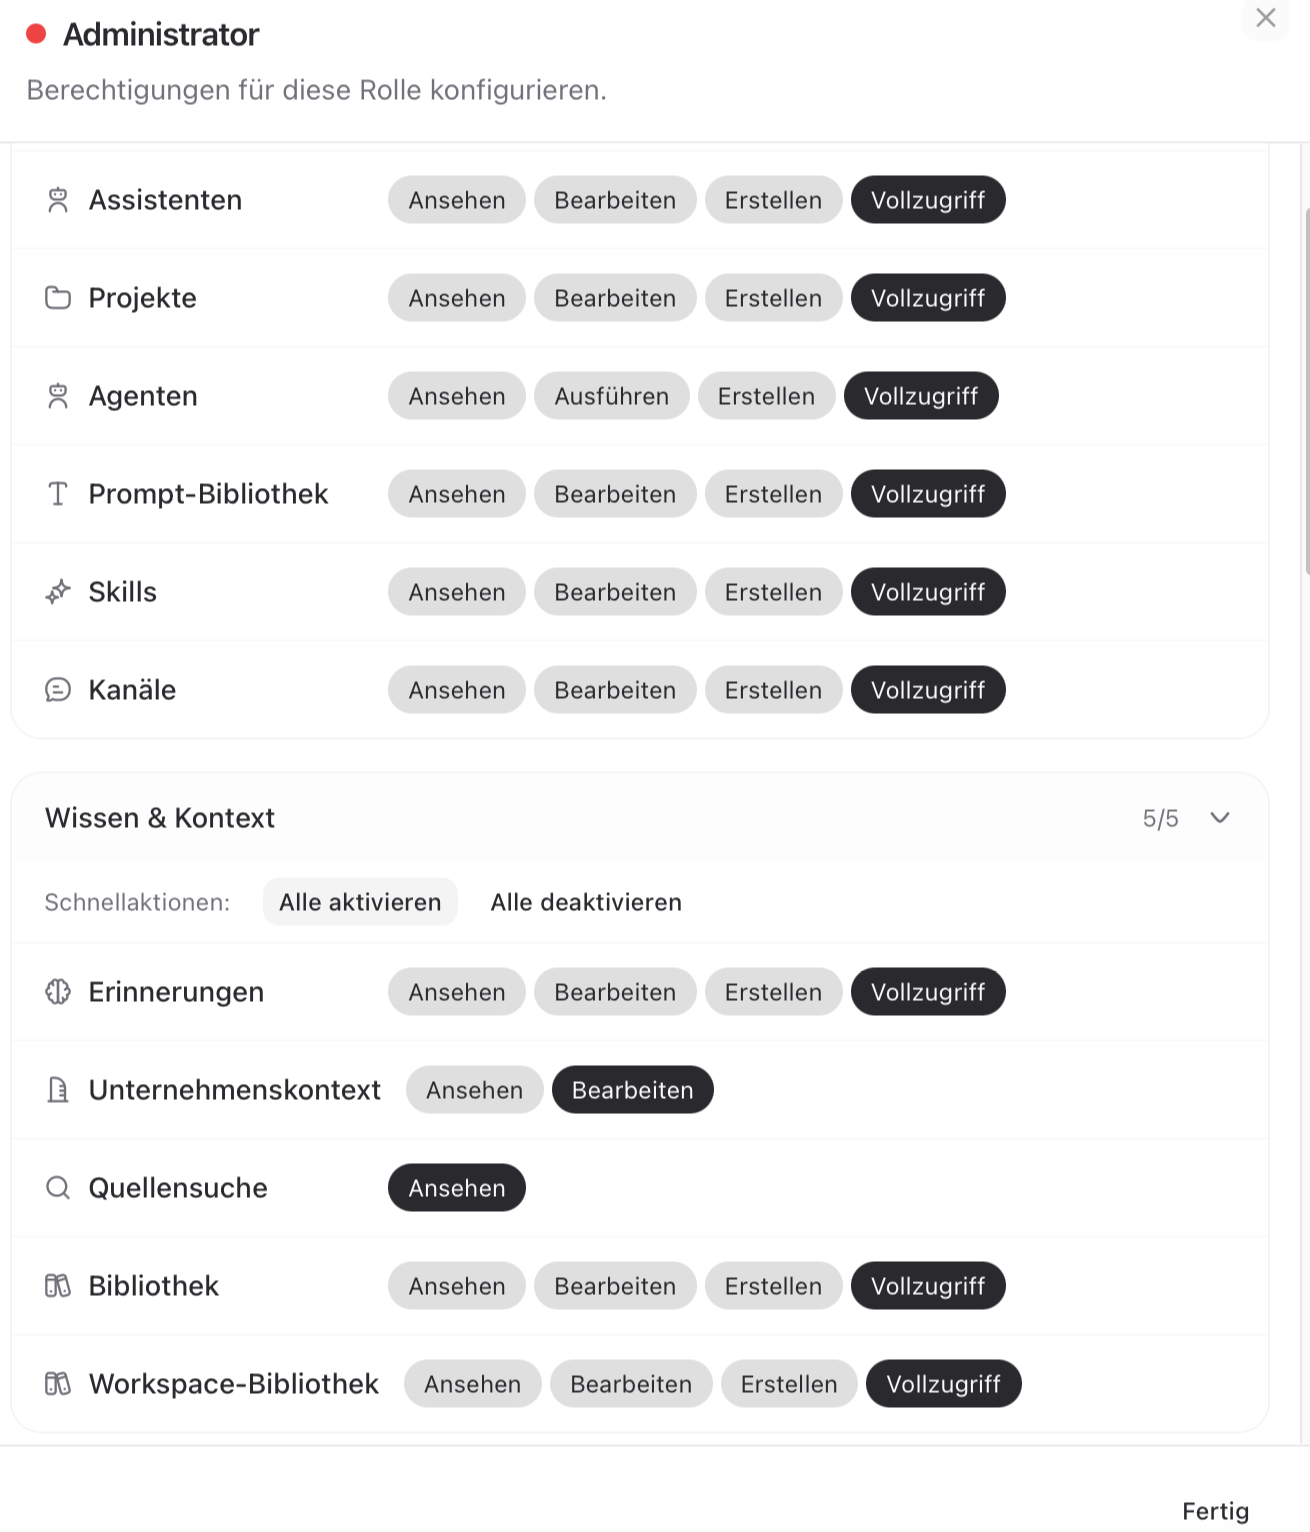
If Workspace members cannot see certain functions, it is often due to the role’s permissions.
Model permissions per role
You can also control which AI models a role is allowed to use. This is useful, for example, to restrict a compliance team to EU-only models:
Settings → Models → Chat
Select which roles have access for each model
Members of this role will only see the approved models in the chat
Set company context
To ensure all AI responses align with your company, you can centrally define a company context. This is automatically incorporated into every conversation in your workspace.
Go to Settings → Workspace Settings
Scroll to Company Context
Enter, for example, company name, industry, tone, products, internal terms
This ensures all members receive consistent, context-aware responses—without everyone having to repeat the context in the prompt.
Set up SSO & Microsoft Entra
For business customers, we support Single Sign-On (SSO) via Microsoft Entra (formerly Azure AD) and other identity providers. This allows your employees to log in using their existing company accounts.
Setup: We’ll configure SSO together with you during a brief onboarding session. Email us at support@innogpt.de — we’ll send you a calendar link.
Keep track of usage & billing
Under Settings → Billing, you’ll see:
Current plan and number of licenses
Monthly usage per member and total
Invoices for download
Usage by model type (Standard vs. Premium models)
Good to know: Premium models like Claude Opus 4.6 or GPT-5.2 consume more budget than standard models. If your team works extensively with premium models, you can track this here—and, if necessary, manage it via model access permissions.
Usage limits are reset every calendar month.
Enable integrations for the team
As an admin, you can control which integrations (SharePoint, OneDrive, Google Drive, Outlook, …) are available across the workspace.
Settings → Integrations → Enable integration
Control permissions by role (see the Roles section)
Members can then connect their personal accounts independently in their profile settings
Frequently asked admin questions
"I'm an admin, but I can't find a specific setting."
Most administrative functions are located under Settings → User Management or Workspace Settings. If a function is missing: Check the role permissions to see if it is enabled for your admin role.
“A member can’t see certain models.”
Go to Settings → Models → Chat and check whether the desired models are enabled there. Only enabled models appear in the chat for your members.
“Features like Skills or Tasks are missing for my members.”
Enable them in the role: Settings → User Management → Roles → 3-dot menu → Permissions.
“Do admins need their own license?”
Yes — admin accounts are included in the standard billing plan. For larger companies, we can provide admin licenses separately upon request. Please contact us.
“How can I analyze my team’s usage?”
Under Settings → Billing, you can view usage per user, per model, and over time—ideal for internal cost control.
Related articles
📊 Usage limits & fair use policy — how the budget works per plan
💳 Manage subscription — Upgrade or cancel your plan, Stripe customer portal
🔗 Set up integrations — SharePoint, OneDrive, Google Drive & Co.
Need help?
Do you have questions about Workspace management, need help setting up SSO, or want to optimize your setup? Write to us or book a quick onboarding session right away. We usually respond within one business day.